Build a serverless hit counter on AWS using Terraform

I automate everything.
In this easy-to-follow guide, you will learn how to create a hit counter for your website. You will need to be familiar with AWS serverless services and have a basic understanding of Terraform to be able to easily follow this guide. At the end of this guide, you will build a hit counter API that you can integrate into your web pages. See a working demo here. https://demos.nquayson.com/hitcounter/index.html
Why build a hit counter from scratch on AWS when other services exist for the purpose?
Consider this as a fun little hands-on project that hones your AWS, IaC and Python programming skills!
Overview
Here is a quick overview of all the services that will be deployed in this project:
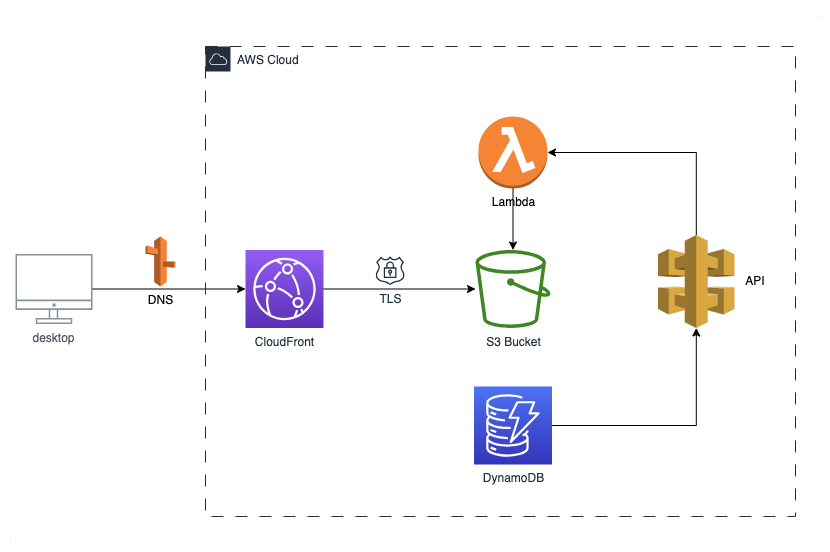
S3 bucket for hosting the static assets of the web application
ACM certificate for enabling secure communication over HTTPS
Cloudfront for serving the static assets across edge locations for our global user base
DynamoDB will be our NoSQL database choice
Lambda function for running our backend logic and eventually getting and setting the values in the database.
Lambda function URL will be used rather than an API Gateway
Prerequisites
An AWS account and some AWS experience
Some Infrastructure as Code (IaC) knowledge
An AWS CLI profile configured for your development environment to access your AWS account
Fork the repository
Before we start, make your fork of the repository containing the full source code. This will be your own copy giving you the flexibility to experiment and explore.
Lambda function logic
The handler function will be the entry point when lambda is invoked. The handler calls the update_hit() function which updates the 'hit_count' attribute of a specific item (key = "1") in the DynamoDB table. The UpdateExpression parameter defines the update operation to perform. Here, it uses the 'ADD' action to increment the value of the 'hit_count' attribute by 1. The updated value of 'hit_count' is returned and we expect that as a string. The string zfill() method is used to pad a copy of this string with zeroes on the left. Resulting in the transformation "234" -> "00234"
Terraform provider
Time to write some Terraform for provisioning our resources. First, we declare the provider block in provider.tf file. The default_tags mean that all resources created with this provider will be tagged with the provided map.
provider "aws" {
  profile = "YOUR_CLI_PROFILE"
  region  = "us-east-1"
  default_tags {
    tags = {Name = var.name}
  }
}
Variables
We define some variables we need in variables.tf. We also declare the full_name local variable, which is a concatenation of name and env variables. This variable will be mainly used as the (aws-end) name of major resources. This way we can easily replicate the project for a different environment, such as another region within the same account, without worrying about name collisions.
variable "name" {
  description = "Name of application"
  default = "demo"
}
variable "env" {
  description = "Environment name"
  default = "env"
}
locals {
  full_name = "${var.env}-${var.name}"
}
Lambda Function
The rest of the code, except output, is defined in main.tf. Here we provision the lambda function that runs on Python3.8, using a deployment package in a zip archive. We also define an IAM role that the lambda function can assume. The role provides AWSLambdaBasicExecutionRole and an inline policy that allows the lambda function read and write access to the DynamoDB database.
resource "aws_lambda_function" "myfunc" {
  filename         = data.archive_file.zip.output_path
  source_code_hash = data.archive_file.zip.output_base64sha256
  function_name    = local.full_name
  description      = "Hit counter demo"
  role             = aws_iam_role.iam_for_lambda.arn
  handler          = "func.handler" #filename.handlermethod
  runtime          = "python3.8"
  environment {
    variables = {
      TABLE_NAME = aws_dynamodb_table.hitcount.name
    }
  }
}
resource "aws_iam_role" "iam_for_lambda" {
  name = local.full_name
  assume_role_policy = data.aws_iam_policy_document.allow-lambda-assume.json
  managed_policy_arns = [
    "arn:aws:iam::aws:policy/service-role/AWSLambdaBasicExecutionRole"
  ]
  inline_policy {
    name   = "ddbreadwrite"
    policy = data.aws_iam_policy_document.ddbreadwrite.json
  }
}
data "archive_file" "zip" {
  type        = "zip"
  source_dir = "${path.module}/lambda/"
  output_path = "${path.module}/packedlambda.zip"
}
data "aws_iam_policy_document" "allow-lambda-assume" {
  statement {
    effect  = "Allow"
    actions = ["sts:AssumeRole"]
    principals {
      identifiers = ["lambda.amazonaws.com"]
      type        = "Service"
    }
  }
}
Database
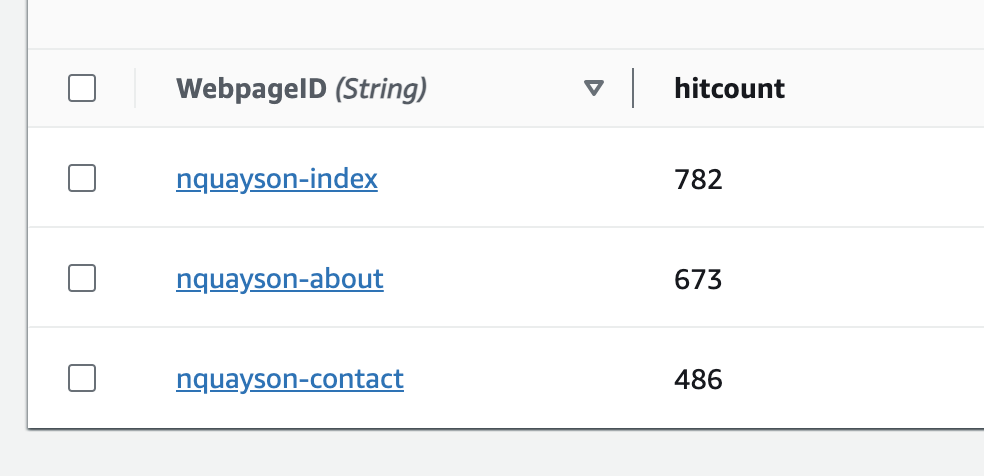
The database is DynamoDB with a single table; an id and hitcount columns. We can store as many website pages as ids and their corresponding hit counts in the hitcount column.
data "aws_iam_policy_document" "ddbreadwrite" {
  statement {
    sid       = "ddbreadwrite"
    effect    = "Allow"
    actions   = ["dynamodb:Scan", "dynamodb:PutItem", "dynamodb:GetItem", "dynamodb:UpdateItem"]
    resources = ["*"]
  }
}
resource "aws_dynamodb_table" "hitcount" {
  name           = local.full_name
  billing_mode   = "PAY_PER_REQUEST"
  hash_key       = "id"
  attribute {
    name = "id"
    type = "S"
  }
}
The API
A lambda function URL will serve as the https endpoint to our lambda function. This is a quick way to create an API, but usually not suitable for production use.
resource "aws_lambda_function_url" "url1" {
  function_name      = aws_lambda_function.myfunc.function_name
  authorization_type = "NONE"
  cors {
    allow_credentials = true
    allow_origins     = ["*"]
    allow_methods     = ["*"]
    allow_headers     = ["date", "keep-alive"]
    expose_headers    = ["keep-alive", "date"]
    max_age           = 86400
  }
}
Here is the full GitHub code for the project.
Let's run Terraform
To run Terraform we go through the workflow steps:
terraform init
terraform plan
terraform apply
Outputs
Our resources should now be created in the AWS account. We see a terminal output for the new function URL endpoint. Making a get request to this endpoint should return the hit count value.
Changes to Outputs:
  + function_endpoint = "https://4pxyxy0e.execute-api.us-east-2.amazonaws.com/prod/api"
What's next: Embedding the counter API into a webpage
Now that our API is successfully deployed, we can integrate it into a webpage by writing some Javascript in our frontend.
url = "https://4pxyxy0e.execute-api.us-east-2.amazonaws.com/prod/api"
let mcount = ""
fetch(url)
  .then(response => response.text())
  .then((response) => {
      console.log(response)
      mcount = response
      for (let i = 0; i < mcount.length; i++) {
        var newSpan = document.createElement('span');
        newSpan.innerHTML = mcount[i];
        document.getElementById('mydiv').appendChild(newSpan);
      }
  })
  .catch(err => console.log(err))
The code fetches data from our API endpoint via a GET request and then appends each character of the text response to an HTML span on the webpage.
See the full working demo here.
Let me know your thoughts in the comment section.